Details Tab
Once a supplier has been created, further supplier information is added via the Creditors screen, which is divided into two main sections - a header section and a body section:
- The header section comprises approximately the top quarter of the screen and includes the creditor code and name, dates of the Current and Closed Accounting Periods, and a number of buttons (Delete, Exit, Copy Creditor, Discard and Save).
- The body section comprises four tabs (Details, Analysis, and Currencies) and the Details tab is highlighted by default after creating a new creditor.
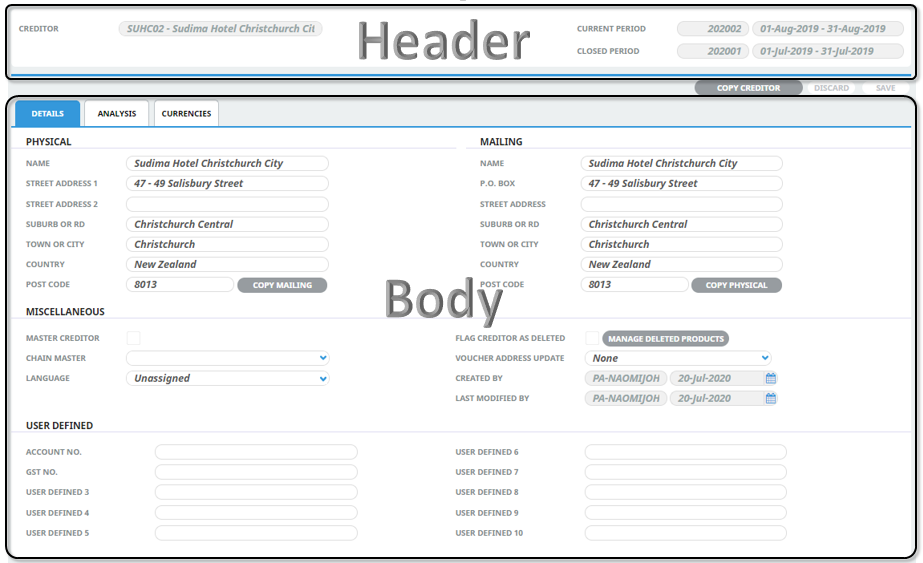
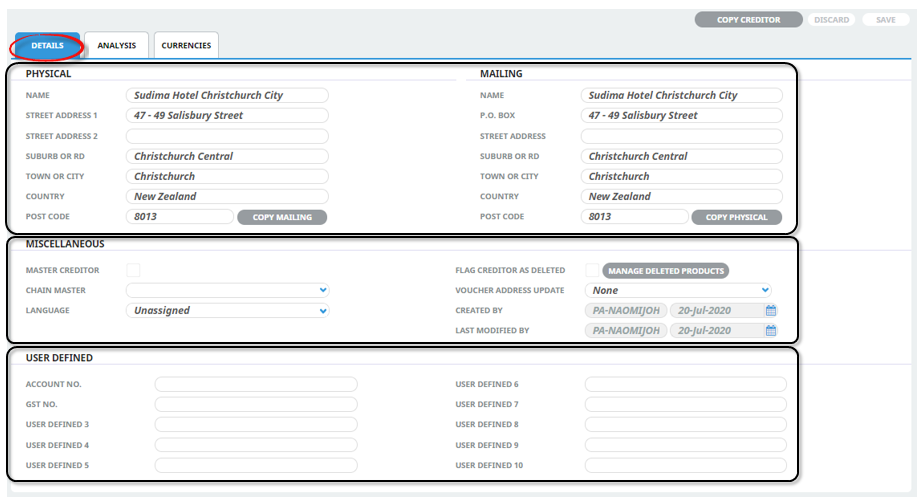
The Details Tab is divided into three sections - Address Details, Miscellaneous Details and User Defined Details. These are described below.
NOTE: The labels and field data shown in screenshots in this guide provide examples of how supplier details might be entered. The following notes also describe fields within the Details Tab, to help with selections and decisions around supplier information.
Enter Creditor Details
- If the supplier to which details are to be added does not exist, create the supplier first (see Create a New Creditor).
- If the supplier does exist, search for and retrieve it, so that creditor details are displayed on the screen (see Retrieve an Existing Creditor).
-
Enter details into the
 Details screen fields as required.
-
To keep the changes, clickSave.

-
ClickDiscard to discard all changes.

About Details Tab Fields
Physical and Mailing Details Section
Physical Address and Mailing Address Fields (60 chrs each)
Two sets of name and address detail fields are available - physical address and mailing address and these can be different. When a new supplier is first created, the supplier name is entered into both the physical address and mailing address fields, either of which can be overwritten if necessary.
When inserting a Physical address, the address information will populate into the Mailing Address fields as well. Inserting different information into the Mailing Address updates the Mailing Address only (the physical address information will remain).
It is imperative that consistency be maintained when entering address detail; i.e. always use the same line for the Street Address and the same line for Town / City etc.
Try not to use commas in supplier name and address fields. When data is output from creditors (e.g. to an electronic payment type file) and it is imported into another application, the commas will cause the data to be shifted into incorrect fields in the other application.
Post Code (12 Chrs)
Enter the supplier's Post/Zip Code.
Miscellaneous Details Section
Miscellaneous creditor information is a group of unrelated details, including:
- Master Creditor checkbox to indicate whether or not this is a master creditor.
- Who the Chain Master supplier is (if assigned).
- Language, which indicates if supplier messages are to be sent in a different language (languages, and translations would need to be available from Code Setup).
- Flag Creditor as Deleted, which indicates whether or not this creditor can be found in searches.
- Voucher Address Update, which specifies how updates should be applied to voucher addresses.
NOTE: The data available in the Language Code drop-down is defined in Code Setup which is detailed in the System Setup User Manual.
Also included in miscellaneous details are four read-only metadata fields about this supplier record.
Master Creditor / Chain Master (Checkbox/Drop-down)
Tourplan allows suppliers to have subsidiary suppliers. This feature means, for example, that Supplier Remittance Advices detailing transactions for subsidiary suppliers can be sent to, and the cheques made out to, the head office/master supplier. The transactions remain against the subsidiary supplier, with the physical documents only being made out to the master supplier.
For this feature to work, the system has to know which supplier is the Master and which are the subsidiaries:
- If the supplier being entered is a Master, then click the check box Chain Master.
- If the supplier being entered is a subsidiary of a supplier which has already been entered and defined as a master, click the drop-down Chain Master list and select the master supplier from the list.
- If the supplier being defined is not a master or a subsidiary supplier, leave both fields blank.
This feature should only be used where payment for services from one supplier has to be made tor an affiliated supplier/creditor, e.g. the payment for a supplier has to be made to a head office supplier, not directly to the service supplier.
If payments are not required to be made to a Head Office/Master on behalf of subsidiary suppliers, then these fields should be left blank.
The methods of making payments to either the Master Supplier or the Subsidiary Supplier are covered in Invoicing Variations
Language (Drop-down)
The language code in this field determines which set of document and message templates are displayed when sending messages to this supplier. These language codes must first have been set up via Code Setup (see System Setup User Manual, menu Home > System > Code Setup > Messaging > Language). If different language documents or messages are not required, then leave this field as Unassigned.
Flag Creditor as Deleted (Checkbox)
This flag "hides" the supplier when bookings/quotations are made, so that consultants cannot use this supplier in a booking. The supplier is then only available for maintenance via the Creditors application.
Manage Deleted Products (Button)
Selecting this button allows users to view a list of products and services linked to the Supplier on screen. Marking of individual products/services as deleted can be managed from this alternative view, providing added flexibility to the maintenance of marking deleted products attached to the Supplier.
Voucher Address Update (Drop-down)
This drop-down is used when address details of an existing supplier are modified. When the supplier is used in Product Database, the physical address details are saved as the voucher address in the Product (see the Product User Manual, Add Voucher Details). If the address details change, choose a drop-down selection to determine whether or not the address details in any Products in which the supplier is used should also be updated. The choices are:
|
Selection |
Effect |
|---|---|
| None | Products will not be updated with new name or address details. |
| All With Physical Address | All Products that have this supplier's physical address will be updated, regardless of the voucher address. |
| All With Mailing Address | All Products that have this supplier's mailing address will be updated, regardless of the voucher address. |
| Matching Physical Address | Only Products for this supplier that have the exact original physical address (before modifying) will be updated with the new name or address details. |
| Matching Mailing Address | Only Products for this supplier that have the exact original mailing address (before modifying) will be updated with the new name or address details. |
User Defined Details Section (60 Chrs)
As with the address fields, there are 10 user defined fields that can have labels defined for them via menu Home > System > Code Setup > INI Settings. If field headings have been inserted and the organisation is using these fields, insert the necessary information for this creditor.