If user organisations are using internal messaging queues they can be monitored, actioned and printed using Queue Management functions. Filters are selected and a list of queues results will show for processing of tagged queues.
This function allows users to update the queue statuses and send the messages to the entity that owns the queued message. Queue management filters can also be saved so that repeatable tasks can be easily used.
Queue Management
-
From the Home menu, select
 Home > Operations > Booking Operations > Queue Management.
- Click the Home Menu to expand it:

- Click the Operations menu option to expand it:

- Click Booking Operations menu option to expand it:

- Click Queue Management to open the Queue Management screen:

- Click the Home Menu to expand it:
-
ClickManual.

-
On the blankQueue Management - Manual Selection screen, the Queue Tab will open, select the required filters from the field selections available within the Queue Tab. View Queue Management Fields to learn more about all the field selections available, or view the individual tab filters;
Queue Tab, PCM Tab, (PCM) Analysis Tab, Booking Tab, (Booking) Analysis Tab, Service Tab, (Product) Analysis Tab or Results Tab.
NOTE: The Queue Scope field triggers the Tab selections available.
For example: Selecting a Queue Scope of Booking, will allow selections within the Booking and the Analysis Tab.
Where as selecting a Queue Scope of Supplier, will allow selections within the Supplier and the (Supplier) Analysis Tab.
- Check the completed screens.
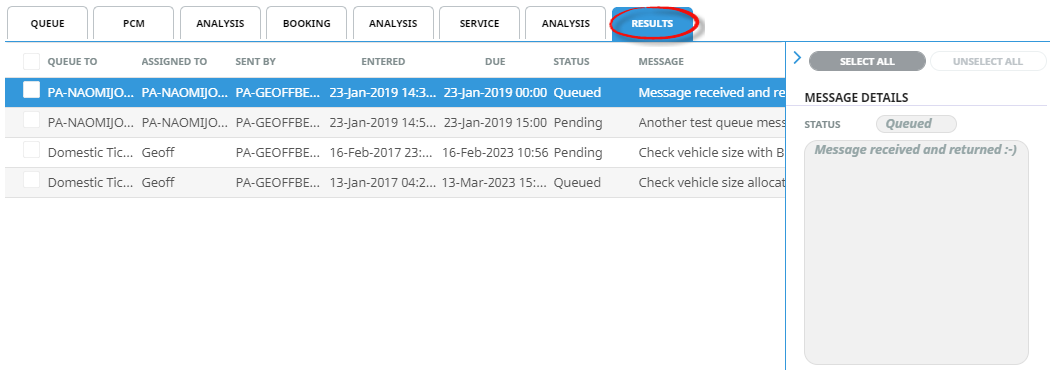
- Click on the Results Tab.
- If Save Filter is selected the New Selection Description will appear in the Header of the Results Tab and the Description will display each time users open Queue Management. If selected for future Queue Management, results will be returned based on the saved filters.
- If Add is selected you will return to the results screen, where you can select to Process messages (following from the steps below), or Exit.
- Select Queues by either:
- Using the check-box next to individual queues or,
- Using Select All.
-
Clickprocess.

-
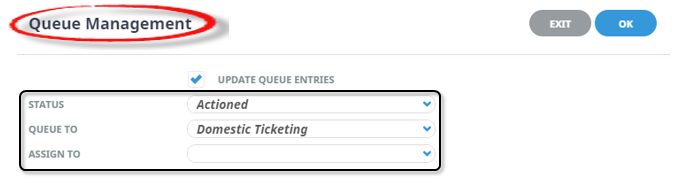
On the Queue Management screen, clickUpdate Queue Entries. The status of the queues can be marked as; actioned, archived, pending or queued.
NOTE: A Queued Destination can be assigned to the queue to field or the queue can be assigned to a colleague.
-
ClickOK to keep the changes and save or update the entry.

-
ClickExit to discard any changes.


About Queue Management Booking Fields
Queue Tab
This is the default tab that will open when selecting to insert a Manual Queue Management.
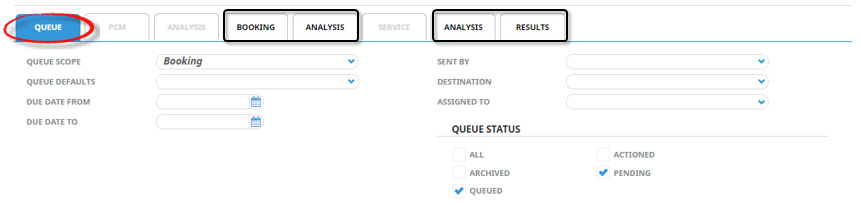
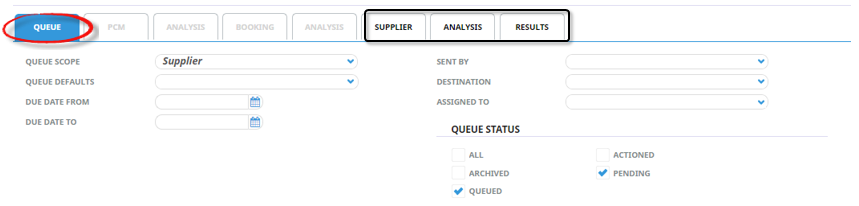
Queue Scope - this selection will trigger the availability of the filter tabs. Selection for one of the following can occur; either leave unassigned or select Booking, Booking Service Line, PCM, PCM Service Line, Agent, Supplier, User or General.
Queue Defaults - A pre-set queue destination may be available based on the Queue Scope selection. Selecting a queue default here will select all message queues using this default.
Due Date From and To - This is the date the Queue was due on. If selection for a range of dates is entered here Queues that fall within the date range provided will be display in the results screen.
Sent By - A specific colleague or user can be selected to return queues for this user.
Destination - A specific destination or group of user can be selected to return queues for this destination.
Assigned To - A specific colleague or user can be selected to return queues that are assigned to this user.
Queue Status - By default, Queued and Pending are selected however these can be changed by clicking on the required check boxes.
BookingTab
The booking tab is triggered when Queue Scope selection is one of the following:
- (Unassigned)
- Booking
- Booking Service Line
- General
The top section includes 'Current Service' field selections and 'Booking Filter' selections. The bottom section includes selection for Booking Status, Branch and or Department.
Last Worked Date from and to - This is the date the booking was worked on. If selection for a range of dates is entered here Queue Messages for bookings that have a last worked date within the date range provided will be display in the results screen.
Travel Date from and to - Travel date for bookings is the date that appears in the header of a booking this is generally the date of the first service. This date range field is used to select bookings with a specific date, or Queue Entries for bookings that fall within a range of travel dates.
Agent from and to - Used to select Queue Messages with a specific, or range of, agent(s) codes in the booking header matching the selection.
Master Agent from and to - Used to select Queue Messages with a specific, or range of, Master Agent code(s) in the booking header matching the selection.
Booking Date from and to - This is the date the booking was entered. If selection for a range of dates is entered here Queue Messages for bookings that were created within the date range provided will be display in the results screen.
Consultant - The consultant code attached to the bookings whose messages are to be output.
Booking Status - By default, all booking status' are checked and bookings that have those status will be selected. Un-check statuses that are not required.
Branch - By default, all branches are checked and bookings that have those branches will be selected.
Department - By default all departments are checked, bookings that have those branches will be selected.
Analysis Tab - (Booking)
Booking Analysis - The top two rows of this tab are the 6 Booking Analysis codes. These are booking level selections.
Agent Analysis - The bottom two rows of this tab are the 6 Agent Analysis codes. These are Agent Analysis codes attached to the booking.
Analysis fields can be expanded or minimised by using the + or - function.
Service Tab
The service tab is triggered when Queue Scope selection is one of the following:
- (Unassigned)
- Booking Service Line
- PCM Service Line
- General
The top section includes 'Current Service' field selections and 'Booking Filter' selections. The bottom section includes check box selection for Service Status, Service (Type) and or Voucher Status.
Service Date from and to - This is the date of the service within a booking. If selection for a range of dates is entered here Queue Messages for services that fall within the date range provided will be display in the results screen.
Supplier from and to - Used to select Queue Messages with a specific, or range of, supplier(s) codes matching the selection.
Master Supplier from and to - Used to select Queue Messages with a specific, or range of, Master Supplier code(s) matching the selection.
Location - The Queue Message for a location code attached to the service.
Service Status - By default, all service status' are checked and services that have those statuses will be selected. Un-check statuses that are not required.
Service Type - By default, all Service (Types) are checked and Queue Messages for those service types that have been selected will return results.
Voucher Status - By default all voucher statuses are checked, Queue Messages for those voucher statuses selected will be returned in the results tab.
Analysis Tab - (Service)
Product Analysis - The top two rows of this tab are the 6 Product Analysis codes. These are service level selections.
Supplier Analysis - The bottom two rows of this tab are the 6 Supplier Analysis codes. These are Supplier Analysis codes that can be attached to the Supplier.
Analysis fields can be expanded or minimised by using the + or - function.
BookingTab
The booking tab is triggered when Queue Scope selection is one of the following:
- (Unassigned)
- Agent
- General
The top section includes 'Current Agent' field selections.
Agent from and to - Used to select Queue Messages with a specific, or range of, agent(s) codes in the booking header matching the selection.
Master Agent from and to - Used to select Queue Messages with a specific, or range of, Master Agent code(s) in the booking header matching the selection.
Analysis Tab - (Agent)
Agent Analysis - The top two rows of this tab are the 6 Agent Analysis codes.
Analysis fields can be expanded or minimised by using the + or - function.
PCM Tab
The PCM tab is triggered when Queue Scope selection is one of the following:
- (Unassigned)
- PCM
- PCM Service Line
- General
The top section includes 'PCM Header' field selections. The bottom section includes selection for PCM Statuses.
Travel Date from and to - Travel date for bookings is the date that appears in the header of a booking this is generally the date of the first service. This date range field is used to select bookings with a specific date, or Queue Entries for bookings that fall within a range of travel dates.
Agent - Used to select Queue Messages with a specific, agent code in the PCM header matching the selection.
Based Date from and to - This is the base date selected when the PCM was entered. If selection for a range of dates is entered here Queue Messages for PCM that fall within the date range provided will be display in the results screen.
Date Entered from and to - This is the date the PCM was entered. If selection for a range of dates is entered here Queue Messages for PCM that were created (or entered) within the date range provided will be display in the results screen.
PCM Status - By default, all PCM statuses are checked and PCMs that have those status will be selected. Un-check any statuses that are not required.
Analysis Tab - (PCM)
PCM Analysis - The top two rows of this tab are the 6 Booking Analysis codes. These are booking level selections.
Analysis fields can be expanded or minimised by using the + or - function.
About Results Tab Fields
Selected check boxes - Queues can be individually selected.
Select All-Unselect All (Buttons) - These buttons will allow you to select all queues found, or un-select all queues selected.
NOTE: The data can be sorted by any column by double clicking the column header. The order can then be reversed by clicking the column header again.
About Queue Management Settings
Update Queue Entries – Queue Management information can be updated.
Status - Selection from Actioned, Archived, Pending or Queued.
Queue Messages – When this check box is selected the Queue/Messaging fields will activate and one of the following can be selected:
- Queue to - who the message is queued to (if Queue Groups have been setup)
- Assigned to - who the message is assigned to
Open an Existing Queue
A list of Queue results can be obtained when searching for the Queue Default. Users can view results as to when the Queue was sent, to whom and the status of the queue from within the results screen. Queues can be printed or downloaded to a CSV or PDF file.
Find Queue Results
-
From the Home menu, selectHome > Operations > Booking Operations > Queue Management.
- Click the Home Menu to expand it:
- Click the Operations menu option to expand it:
- Click Booking Operations menu option to expand it:
- Click Queue Management to open the Queue Management screen:
- Click the Home Menu to expand it:
- A list of previously created Queue Descriptions will display, click on the Queue Description line.
-
Select theResults Tab to display a list of Queue Messages using the Queue Description.
Printing Queues
- Open the Queue Description on Screen. (Follow Procedure 1 and 2 from Find Queue Results - Procedure above)
-
Users can print the list of queues on screen by selectingPrint.

-
Further options are made availableto:

- 'View' results from a report on screen
- 'Download CSV' file
- 'Download PDF' file
-
ClickExit to discard any changes.